Programming Basic Peripherals of STM32F103C8T6 using Keil
STM32F103C8T6 falls under medium density ARM-Cortex M3 based microcontroller with on chip RAM of 20KB and Flash of 64KB, with decent number of on chip peripherals, Here i will show how this controller can be programmed using keil.
In my earlier post I covered how to add Secondary bootloader to STM32F103C8T6 you can find it from here.
In this post i will show how to program GPIO of STM32F103C8T6.
On board LED is connected to Port C -13pin. Basic things required for programming are
1. Keil IDE - Download
2. Common Files - Download
3. Manuals - Hardware - Download
Peripherals- Download
Just create one folder and extract common files in to that folder and open keil and create project
in that folder with out any extension give some name say led
Select Project->New Project->led.uvproj->STM32F103C8
allow startup file to be added to project
Right click on source group and add System_Stm32f10x.c
and create one app.c and add it to source group
 In app.c just include stm32f10x.h
write main function
Steps to Program GPIO
1) Power on GPIO by enabling Power to Port-c by setting bit 4 of APB2ENR register
this is part Reset and Clock Control (RCC) structure
2) Default Function of Port-C 13 pin is GPIO (from Hardware manual you can get this information)
3) Configure relevant registers of GPIO
Set Direction of GPIO as output push pull mode
by writing 1 to 21st bit of CRH register
4) then turn Port-C.13 pin on and off by writing in to BSRR and BRR register 13th bit with software delay in between
 Select target options and click C/C++ and under define type STM32F10X_MD

Then click on Save and Rebuild It should give zero errors and zero warnings
 click on debug and select peripherals-> GPIO C and click on run


Do small settings in program.
first under target change start to 0x8003000

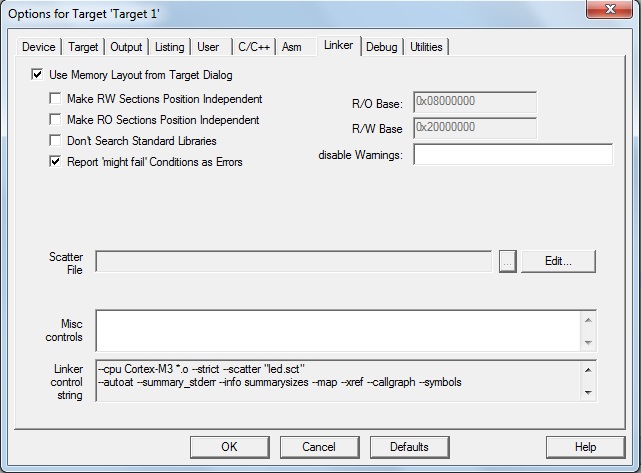
then under linker check select from target options

in System_stm32f10x.c change Vector Table Offset to 0x3000

in app.c add SystemInit() and increase delay

output generate hex and using dfu manager convert hex to dfu file

for interfacing lcd to stm32f103c8t6 click here
STM32F103C8T6 falls under medium density ARM-Cortex M3 based microcontroller with on chip RAM of 20KB and Flash of 64KB, with decent number of on chip peripherals, Here i will show how this controller can be programmed using keil.
In my earlier post I covered how to add Secondary bootloader to STM32F103C8T6 you can find it from here.
In this post i will show how to program GPIO of STM32F103C8T6.
On board LED is connected to Port C -13pin. Basic things required for programming are
1. Keil IDE - Download
2. Common Files - Download
3. Manuals - Hardware - Download
Peripherals- Download
Just create one folder and extract common files in to that folder and open keil and create project
in that folder with out any extension give some name say led
Select Project->New Project->led.uvproj->STM32F103C8
allow startup file to be added to project
Right click on source group and add System_Stm32f10x.c
and create one app.c and add it to source group

write main function
Steps to Program GPIO
1) Power on GPIO by enabling Power to Port-c by setting bit 4 of APB2ENR register
this is part Reset and Clock Control (RCC) structure
2) Default Function of Port-C 13 pin is GPIO (from Hardware manual you can get this information)
3) Configure relevant registers of GPIO
Set Direction of GPIO as output push pull mode
by writing 1 to 21st bit of CRH register
4) then turn Port-C.13 pin on and off by writing in to BSRR and BRR register 13th bit with software delay in between


Then click on Save and Rebuild It should give zero errors and zero warnings

After connecting STM32F103C8T6 board through USB you should see following class of USB DFU


Do small settings in program.
first under target change start to 0x8003000

then under linker check select from target options

in app.c add SystemInit() and increase delay

output generate hex and using dfu manager convert hex to dfu file

then upload dfu in to hard ware using dfuse software
after uploading press reset.led should toggle for 1sec
for interfacing lcd to stm32f103c8t6 click here
Many thanks for this useful information.
ReplyDeleteAny advice where to find the right ULINK2 driver for MS Windows 10 x64?
Thanks.
https://www.amazon.in/Generic-St-Link-Programming-Metal-Emulator/dp/B01EM10DPO/ref=sr_1_1?ie=UTF8&qid=1545640806&sr=8-1&keywords=st+link
Deletehi can you please send me the dfu.hex password to my email mathankumar.retech@gmail.com
ReplyDeletedfu.hex password please
ReplyDeleteEmail:eng.sedoooo@gmail.com
Could you please send me the dfu.hex password to neelamrani@indivar.com
ReplyDeleteThanks